Zenoti: Integration Quick Facts
- Integration Type: API Connection
- Managed by: TouchMD
- Patient Creation: Available
- File Transfer (JPG/PDF): Not Available
- Syncing Interval: Every 10 minutes for new/edited patients, and nightly for patients scheduled within the next 36 hours.
Zenoti: How it Works
Create TouchMD accounts using Zenoti
When patient accounts are created or edited in Zenoti they will be added to TouchMD (first name, last name, and DOB are required; a patient email address is highly encouraged). This process may take up to 10 minutes before TouchMD receives the patient’s information from Zenoti and the patient account is created TouchMD.
Patients that have appointments scheduled in Zenoti within the next 36 hours will also be added to TouchMD. This process occurs once per day in the evening before midnight MST.
Initial TouchMD patient account creation
As a part of the Zenoti integration setup process a TouchMD patient account will be created for any patients that have been added or modified in Zenoti within the last 30 days, and any patients with Zenoti appointments scheduled within the next 60 days. The Zenoti patient record must contain a full name and date of birth to be created in TouchMD during this process. Please note: because of limitations of the Zenoti API, your entire patient list cannot be synched with TouchMD.
Send pictures, documents and consents from TouchMD to Zenoti
Currently not offered through the Zenoti API.
TouchMD offers a solution for practices who would like to manually move patient pictures and consents from TouchMD to their EMR/EHR/PM. This is called Local Backup. More information may be found here.
Zenoti: Steps to Integrate
Getting Started
- Pay the TouchMD Integration Setup Fee
- Contact your TouchMD Client Success representative or a [email protected] and express your desire for a Zenoti connection. NOTE: If you have more than one location in Zenoti, please indicate which locations you would like to be connected to.
- Send the Zenoti API Key created in the following steps to [email protected] in an encrypted email. If you are unable to encrypt an email (speak with your IT FIRST to learn if possible), email [email protected] requesting that an encrypted email be sent to you to retrieve your Zenoti API Key. To obtain your Zenoti API Key, please complete the next steps listed under step 4.
- Have an practice Admin login into the Zenoti application and follow these steps to generate a new API key:
-
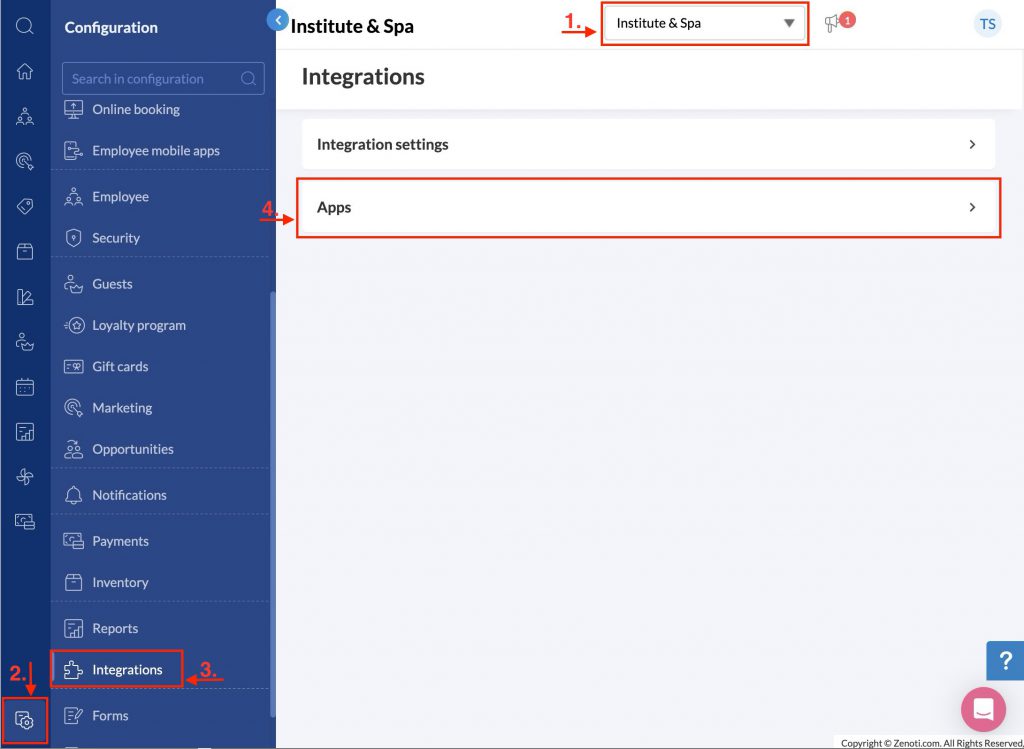
Select your Zenoti Organization (1.), open the ‘Configuration’ menu (2.) > select ‘Integrations’ (3.) > select ‘Apps’ (4.):
- Click ‘Add’ on the ‘Manage Applications’ page, and enter the following information on the General page:
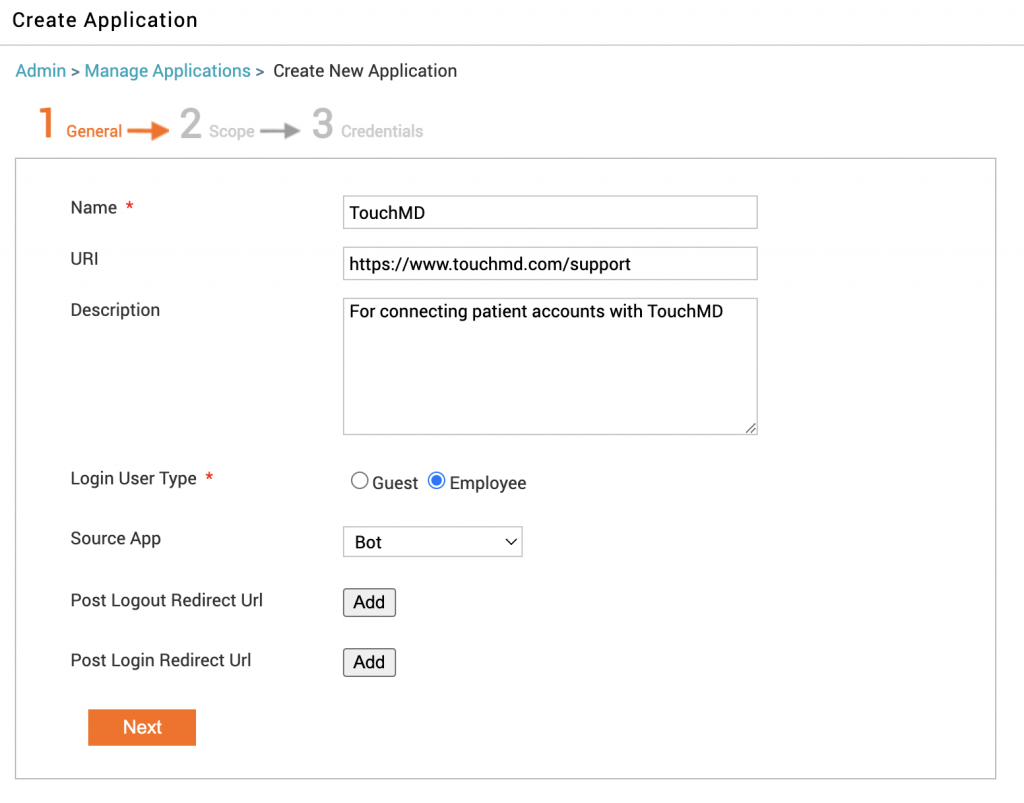
- Name: TouchMD
-
URI: https://www.touchmd.com/support
-
Description: For connecting patient accounts with TouchMD
-
Login User Type: Employee
-
Source App: Bot
-
Post Logout Redirect URL: Do not add, not needed
- Post Login Redirect URL: Do not add, not needed
-
Click Next. The Scope page appears.
-
Manage the scope of your app by selecting the checkbox of data permissions under the appropriate JWT and API groups. For both groups please select the following permissions: Organization Master Read, Appointments, Center Master Read, and Guests Read.
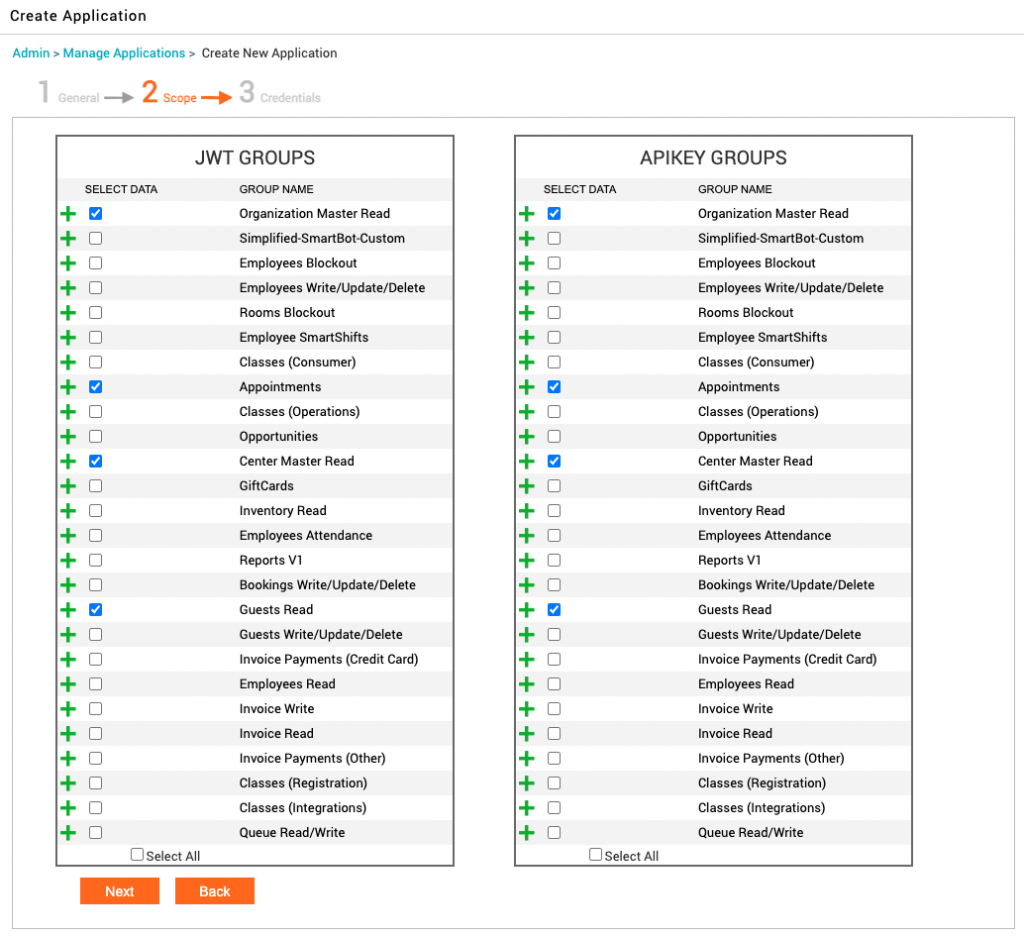
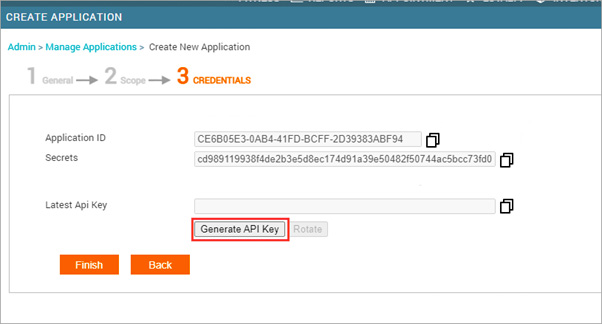
- Click Next. The Credentials page appears. Zenoti generates a new Application ID and Secrets (secret key). These are used to generate a new API key, but are not needed by TouchMD.
-
Click the ‘Generate API Key’ button. Zenoti generates a new API Key for your business and the TouchMD app. Copy this API key by pressing the copy button to the right of the key, paste the API key into the body of the ‘Encrypted’ email sent to you by the TouchMD Integration specialist, and send it.
-
- Using the API Key supplied in the previous step, the TouchMD Support Representative will create an case to activate the API connection between TouchMD and Zenoti.
- Upon activation, any patients that have been added or modified in Zenoti within the last 30 days, and any patients with Zenoti appointments scheduled within the next 60 days, will be used to initially create patient accounts in TouchMD. Please note: patients accounts that are not created during this initial process will be added to TouchMD when a patient is added, edited, or have an appointment within the next 36 hours in Zenoti.
- A TouchMD representative will reach out to confirm the completion of this integration request.
How to rotate (update) your Zenoti API key annually
- Reach out to [email protected] and let them know that you need to rotate your Zenoti API key.
- A TouchMD Integration specialist will reply back to you via an ‘encrypted’ email asking for the updated Zenoti API key. Once you have received this email, please proceed to the next step 3.
- Have an practice Admin login into the Zenoti application and follow these steps to generate a new API key:
- Select your Zenoti Organization (1.), open the ‘Configuration’ menu (2.) > select ‘Integrations’ (3.) > select ‘Apps’ (4.):
- You should now see a list of Integration Apps. To edit the TouchMD App, click the pencil icon next to it.
- Select the ‘Credentials’ tab
- Click the ‘Rotate’ button. Zenoti generates a new API Key for your business and the TouchMD app. Copy this API key by pressing the copy button to the right of the key, paste the API key into the body of the ‘Encrypted’ email sent to you by the TouchMD Integration specialist, and send it.
- Using the API Key supplied in the previous step, a TouchMD Integration Specialist will update the API connection between TouchMD and Zenoti.
- A TouchMD representative will reach out to confirm the completion of this integration update request.
Zenoti: How long will it take to integrate?
TouchMD will start working on your request within 24 – 48 business hours. On average, Zenoti integrations take 1- 2 days to complete once we have received all your Zenoti API information.
Zenoti: What does it cost?
There is a one-time fee to setup an integration with Zenoti. An additional fee will be added to all subsequent TouchMD Monthly Maintenance invoices to maintain the Zenoti interface. The setup fee is to cover the time and resources spent by our IT and Integration teams to configure the integration between TouchMD and your EMR/EHR/PM system. The monthly fee is to maintain the connection between TouchMD and your EMR/EHR/PM system. With the integration, our system stores specific encrypted information on our server for each patient account to correctly link the patient between TouchMD and EMR/EHR/PM system. Storage of this information comes at a cost from our server host and the monthly fee covers those costs.