1. Home
  2. Blast
  3. TouchMD Blast – Creating a Custom Blast

TouchMD Blast – Creating a Custom Blast

How do I get Blast?

Blast is a subscription-based TouchMD addon product and may not be currently available to your practice. To learn more about Blast or sign up for Blast, select here or speak to your Account Manager.

Who can manage?

To manage Blast, log onto the TouchMD Dashbard App and select “Blast”. Note: to manage Blast, the user will need the “Marketing” access role. Select the following link to learn how to manage provider and staff access roles: https://help.touchmd.com/topics/adding-staff-accounts-and-setting-staff-security-roles/ 

Learn how to create a custom Blast via the TouchMD Dashboard app.

How do I add images to my iPad/iPhone to use in Blast?

During the Blast creation process, images from the iCloud Drive and/or the Google Drive may be used. For a quick Blast creation process, it is recommended that images be first uploaded to one of these drives. To learn how to upload images to one of these drives, please see this link.

What file types can be used?

Blast only accepts JPG and PNG file types

What file size should be used for the image?

The image will look best if in a 2:3 landscape ratio. Be sure to place important information in the middle square of the image. It is best if text is not listed on the image, but rather placed in the Blast Title/Message.

Steps of Creating a Blast:

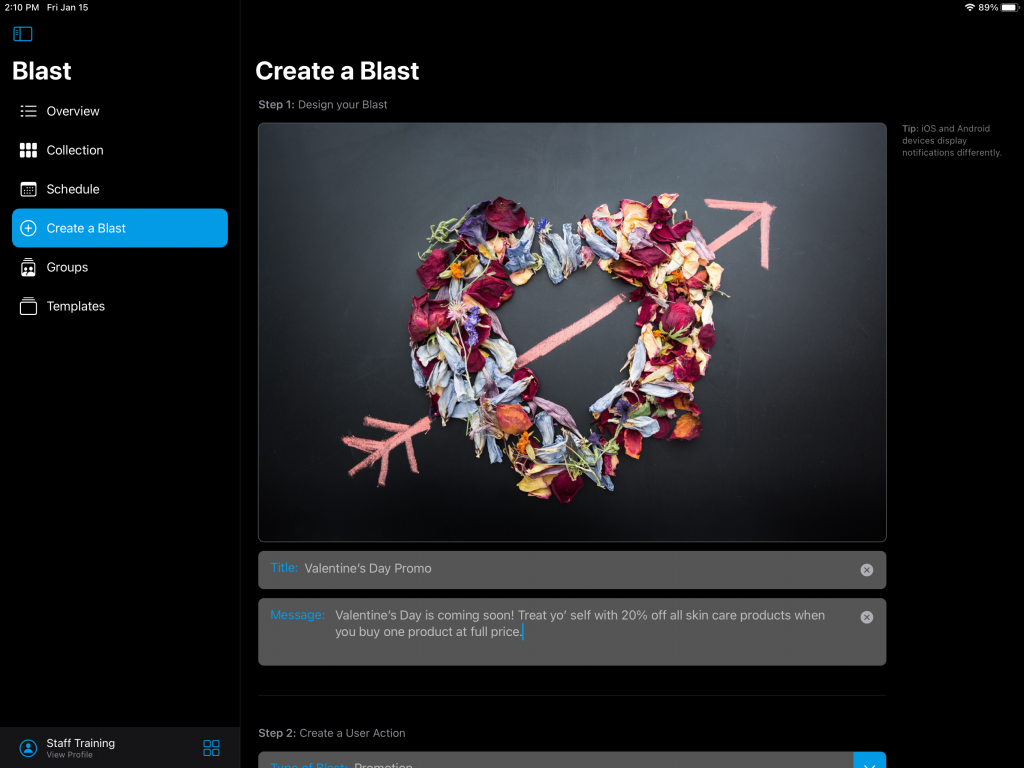
Step 1: Design your Blast

In this area you are determining the design of your Blast which includes an image representing your Blast, your Blast title, and the message of your Blast. (What do you want you patients to know and do!) Need a tip on how to how to get images onto your iPhone/iPad? Select here.

Where can I find stock images for Blast?

It is recommend that you use images that you have the legal right to distribute. Images may be purchased/downloaded from stock photo website such as; iStock, Shutterstock, Unsplash, etc… Note: TouchMD is not affiliated with any of these companies. For any errors, questions, and/or concerns, please contact a support representative for the company you are using. TouchMD is also not responsible for any costs incurred by using these companies.

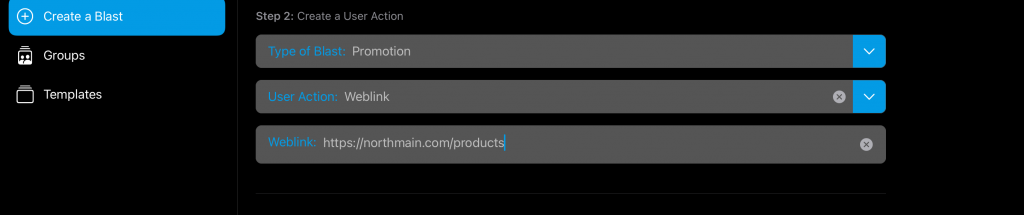
Step 2: Create a User Action

This area allows you to determine the Type of Blast and a User Action.

The Type of Blast is the sort of Blast you would like to send. Available options are Promotion, Event, and Announcement. An example of a promotion would be an upcoming special for a product or service. An example of an event would be a Blast about an upcoming open house. An example of an Announcement would be a Blast regarding office closure dates for an upcoming holiday.

A User Action is something you would like the patient to do while viewing your Blast. You have two options: Weblink or Sheet. “Weblink” allows you to attach any weblink for the patient to select to learn more. For example, attach a link to your online store to allow patients to purchase a product you are sending a Blast about. “Sheet” allows you to attach a Sheet found in TouchMD to select to learn more. For example, attach a Sheet about Botox if your Blast is about erasing crows feet.

Step 3: Select your Audience

Determine your audience in this area. During this step you can either select a previously created Group or create a new Group. To learn how to create a new Group or read some tips, select here.

Step 4: Schedule your Blast

In the final step, you will establish the date that the Blast will release. Optionally, you may set an expiration date. Expiration dates are great for any Blast you wish to have remove from the patient’s notification area within the myTouchMD app.

Schedule Tip

Forget to add something to your Blast? When you schedule an immediate Blast you’ll have 10 minutes to cancel it. 

Print

Updated on November 10, 2022

Was this article helpful?

Related Articles

Leave a Comment