Are you looking to use less paper in your practice? TouchMD may have the solution. This article discusses recommendations on how a practice may employ TouchMD to replace the use of paper in their practice.
Educational Materials
All the educational materials regarding different products and services found in the Presentation Tab of the Consult app may be seen by the patient at home. They are essentially digital brochures. You may utilize Recommendations to highlight specific products and/or services that would be of interest to the patient.
Here are the options to get started:
- Enable stock content from our library (recommended)
- Edit the stock content (optional)
- Create custom content (optional)
How should I use this with a patient:
You will use Recommendations
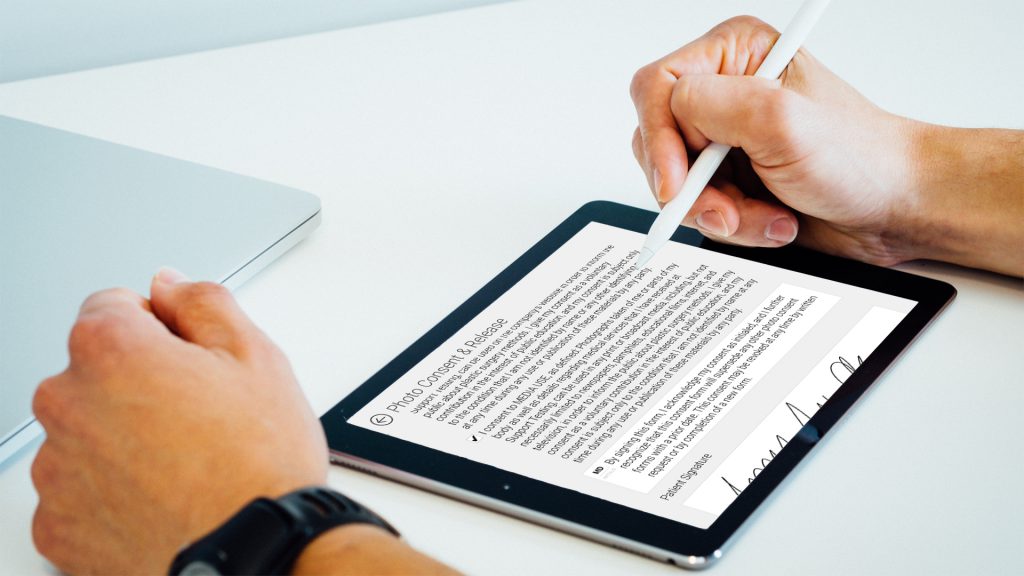
Consents
You may add consent forms to TouchMD. These consents may be custom consents or selected from our library of consents. You will be able to assign consents to patients and they will be able to review, sign, and complete them. *Please note, that some practices also use this feature for intake type forms, however, due to the nature of this feature, consents/intakes will only be produced as a PDF. TouchMD does not input data into third-party intake fields nor does it mine data.
Here are the steps to get started:
- Determine which consents/forms you would like to use in TouchMD
- Add custom consents
- Add consents from an available library (optional)
- Review and publish a consent(s)
How should I use this with a patient:
You will use Consents
Pre and Post Treatment Instructions/Other Information
Pre and post treatment instructions may be added to the feature of Homework. This will allow you to assign specific documents to a patient. *You may also create other packets of additional information that include before and after images, videos, documents, etc…to send to patients.
Here are the steps to get started:
- Determine which pre and post treatment instructions and/or other documents you would like to use in TouchMD
- Add your desired pre and post treatment documents and/or other desired information to Homework
How should I use this with a patient:
You will use Homework
Patient-Specific Documents
Through TouchMD you may add specific patient PDF files into their account for their review or even for your storage. Examples of documents to stored in the Document/Files area may be a price quote, a previously signed consent, a previously filled-out intake form, a previously filled-out treatment form or any other desired document specific to the patient.
Here are the steps to get started:
- Determine which type of patient-specific documents you would like to add to a patient account i.e., treatment price quotes
- Organize the patient-specific documents according to patient and ensure that the patient has been registered in TouchMD.
How should I use this with a patient:
You will utilize the Documents tab via the Consult app or the Files tab via the Dashboard to upload PDFs to a patient account. Do you need to learn how to upload a file via the Dashboard? Select here. Do you need to learn how to upload a file via the Consult app? Select here.
Charting
TouchMD offers an easy-to-use version of charting using Chart Pro.
Here are optional the steps to get started:
- Determine the treatment forms/charts you would like to use in TouchMD
- Convert treatment forms to a JPG via a photo editing software such as; Photoshop. *Some forms may need to be restructured by your team to make it easier to use on TouchMD. Such as adjusting box sizes, margins, text size, etc…
- Upload your treatment forms in the desired Binder and Sheet of your Content (A Binder and a Sheet must be created first). We recommend using the Billboard Section Layout. Some practices like Creating a custom Binder and Sheet called “Treatment Forms” to house all of their forms. Here are more detailed instructions. Do you want a few charts to get started with? See this link.
How should I use this with a patient:
You will use the Consult app’s Chart Pro. See our article on Chart Pro
*Tip: use an Apple Pencil or stylus for easy writing.